Operators
In AIchor an operator is actually a Kubernetes operator, which can be seen as an injected plugin inside a Kubernetes cluster.
The main goal of the operators is to do distributed computing. Operators don't have added value in the case of running a single container.
To do distributed computing, a single experiment might need to schedule a master (or head, …) process then some workers processes and/or any other kind of processes, everything has to be interconnected, roles should be assigned to every containers, etc.
To do that we need a component that deploys everything, assigns the role of each container informs ip/port of master process, etc.
How does it work ?
Operators are containerized programs that are running inside the Kubernetes cluster. The operator is plugged in the Kubernetes API and it watches the creation of resources, then when a new resource is detected it creates the containers and passes them their role which is either just a worker or Master (in case of XGBoost and Pytorch), Coordinator (in case of JAX) or Head (in case of KubeRay). Also what is passed is the ip/port (usually through environment variables), for example with the Jax-Operator:
- Jax-Operator detects a new jaxjob with 3 desired replicas
- Creates the 3 replicas
- container 0: role coordinator (also a worker),
JAXOPERATOR_COORDINATOR_ADDRESS: endpoint(DNS name) of the service pointing to the coordinator itself and port 1234 - container 1: role worker,
JAXOPERATOR_COORDINATOR_ADDRESS: endpoint(DNS name) of the service pointing to the coordinator and port 1234 - container 2: role worker,
JAXOPERATOR_COORDINATOR_ADDRESS: endpoint(DNS name) of the service pointing to the coordinator and port 1234
- container 0: role coordinator (also a worker),
KubeRay Operator
Requirements
The experiment image requires:
rayexecutable (either from base image or python package)wget(apt install wget)
Using virtual envs in your image is not recommended, when installing python packages in a virtual env you need to activate this env to have the installed binaries in your PATH env var. Doing that from the Dockerfile seems like a solution but ray workers are started with bash -l which can overwrite the PATH. We recommend installing python package globally on the image (or with --system if you are using uv).
How to use the KubeRay on AIchor ?
AIchor users can use KubeRay operator by specifying it in the “operator” field on the manifest.
kind: AIchorManifest
apiVersion: 0.2.3

...
spec:
  operator: kuberay
  command: "python3 -u main.py"
  ...

  types:
    Head:
      resources:
        cpus: 1
        ramRatio: 2
        accelerators:
          gpu:
            count: 1
            product: NVIDIA-A100-SXM4-80GB
            type: gpu
    Workers:
    - name: cpu-small
      count: 8
      resources:
        cpus: 6
        ramRatio: 2
    - name: cpu-big
      count: 8
      resources:
        cpus: 12
        ramRatio: 2
Available types
KubeRay Operator comes with 2 types: Head and Workers. Both required
Head
Other components connects to the head. It hosts GCS, Ray dashboard, ...
Worker(s)
Although the head and the workers are scheduled at the same time, workers depend on the head and will need to connect to it. In this context, workers will still wait for the head to be up and running before starting their main process thanks to an init container. The operator takes care of starting ray processes on the workers and connecting them to head.
Submitter
Once head and workers are up and connected, KubeRay will spawn a third type component: the submitter.
This container shall run ray submit with your manifest's spec.command . Experiments logs' will be made available in this container.
Head and Worker should not print much logs after startup.
Setting up the distribution
The distribution is usually done by using the environment variables, it is NOT the case here.
The distribution is initialized before your script starts through the ray start commands executed on every container of the experiment, so you don’t need to interpret any environment variable to setup the distribution.
Init containers on workers produce logs like this:
8 seconds elapsed: Waiting for GCS to be ready.
15 seconds elapsed: Waiting for GCS to be ready.
25 seconds elapsed: Waiting for GCS to be ready.
116 seconds elapsed: Waiting for GCS to be ready.
Traceback (most recent call last):
File "python/ray/_raylet.pyx", line 3272, in ray._raylet.check_health
File "python/ray/_raylet.pyx", line 583, in ray._raylet.check_status
ray.exceptions.RpcError: failed to connect to all addresses; last error: UNKNOWN: ipv4:10.43.84.237:6379: Failed to connect to remote host: Connection refused
129 seconds elapsed: Still waiting for GCS to be ready. For troubleshooting, refer to the FAQ at https://github.com/ray-project/kuberay/blob/master/docs/guidance/FAQ.md.
GCS is ready. Any error messages above can be safely ignored.
Injected environment variables inside the containers
On the head container this set of environment variables are created by the operator.
RAY_CLUSTER_NAME: experiment-6f4a850d-2281-raycluster-q5wqj
On workers containers this set of environment variables are created by the operator.
RAY_CLUSTER_NAME=experiment-6f4a850d-2281-raycluster-q5wqj
RAY_NODE_TYPE_NAME=cpu-workers # name of workers group
KUBERAY_GEN_RAY_START_CMD=ray start  ... # Ray start command for this worker
RAY_ADDRESS= ... # head address: Setting the RAY_ADDRESS env allows connecting to Ray using ray.init() when connecting from within the cluster
RAY_PORT=6379
In your code:
import ray

def main():
    ray.init(address=os.environ.get("RAY_ADDRESS", "auto"))
Ray Dashboard
When your experiment is up and running (at least the head) you can access the Ray Dashboard by clicking on the dashboard link (top right of AIchor’s UI).
Explicitly spawn an actor on a particular component
KubeRay head and workers are started with some logical resources corresponding to their name.
From the example above:
- head will be started with
--resources='{"head":100000}' - worker group "cpu-small" will be started with
--resources='{"cpu-small":100000}' - worker group "cpu-big" will be started with
--resources='{"cpu-big":100000}'
Knowing that, here's a ray decorators requesting this logical resource:
@ray.remote(num_cpus=2, resources={"cpu-small": 1})
In the example above the actor will require 2 CPUs and 1 'cpu-small' which is a logical resource. It means that the actor will run on one of the cpu-small workers and will have 2 CPUs reserved.
A more real use case would be for example to define a parameter server as one of your worker and then use logical resource to force the actor to run on the desired worker.
Jupyter debug mode
Enable it:
...
spec:
	...
  debug:
    jupyter:
      enabled: true
      path: "jupyter" # Optional, defaults to jupyter
...
You also need to provide the Jupyter Server binary inside your experiment’s image, in this example we simply added this to our requirements.txt:
...
jupyter==1.0.0
jupyter-console==6.6.3
jupyter-events==0.6.3
jupyter_client==8.1.0
jupyter_core==5.3.0
jupyter_server==2.5.0
jupyter_server_terminals==0.4.4
jupyterlab-pygments==0.2.2
jupyterlab-widgets==3.0.7
...
Then wait for your experiment to be running. In the logs you should be able to see the logs of the Jupyter server. Find and copy the token. To access the server you can click on the Jupyter button in the "View Dashboard" dropdown. Paste the token.
Additional notes:
- The Jupyter server will run for 12 hours max. When you are done debugging your code, cancel it like a regular experiment.
- The access to this Jupyter server is secured by AIchor SSO.
- The Jupyter server will only be usable from the browser using the web interface. For now, the vscode plugin is not supported because of the SSO security layer.
- When this
spec.debug.jupyter.enabledis true, AIchor will overwrite the manifest's command with a Jupyter server start command.
Customize ray start ... params
By default, ray is started with these parameters:
Head:
--head
--resources='{"head":100000}' # custom resource that you can use to schedule your actors on specific ray node
--include-dashboard=true
--dashboard-host=0.0.0.0
--dashboard-agent-listen-port=52365
--memory=<amount of memory requested in the manifest>
--num-cpus=<amount of CPUs requested in the manifest>
--num-gpus=<amount of GPUs requested in the manifest> # unset if no GPU is requested
--log-color=true
--log-style=pretty
--block
--metrics-export-port=8080
Worker(s):
--address=<head-address:head-port> # set by the operator to connect to head
--resources='{"<name of the worker group>":100000}'
--memory=<amount of memory requested in the manifest>
--num-cpus=<amount of CPUs requested in the manifest>
--num-gpus=<amount of GPUs requested in the manifest> # unset if no GPU is requested
--log-color=true
--log-style=pretty
--block
--metrics-export-port=8080
From the manifest, ray starts params can be added (or overwrite defaults), for example:
kind: AIchorManifest
apiVersion: 0.2.3

...
spec:
  ...
  types:
    Head:
      ...
      rayStartParams: # optional, can be empty
        ray-debugger-external: "true" # allow debugger
        object-store-memory: "3000000000" # https://docs.ray.io/en/master/cluster/cli.html#cmdoption-ray-start-object-store-memory
        num-cpus: "0" # useful to force actors to schedule on workers
      ...
    Workers:
    - name: small-cpus
      rayStartParams: # optional, can be empty
        ray-debugger-external: "true" # allow debugger
        object-store-memory: "1000000000"
      ...
    - name: big-cpus
      rayStartParams: # optional, can be empty
        ray-debugger-external: "true" # allow debugger
        object-store-memory: "5000000000"
      ...
Sample project
AIchor team has shared this demo project that can be cloned and used for AIchor experiments using KubeRay operator.
XGBoost
XGBoost (Extreme Gradient Boosting) is a powerful machine learning framework for gradient boosting.
How to use XGBoost on AIchor
AIchor users can use XGBoost operator by specifying it in the “operator” field on the manifest.
spec:
  operator: xgboost
  image: xgboost-demo
  command: "python src/train.py"

  activeDeadlineSeconds: 86400 # optional, will be overwritten by "timeout" if you provide both
  timeout: "1w 2d 5h 6m 20s" # optional, in weeks (w), days (d), hours (h), minutes (m) and seconds (s)

  types:
    worker: # worker MUST be written in a lower case w
      count: 2
      resources:
        cpus: 8
        ramRatio: 2
    ...
Available types
XGBoost Operator comes with only one type: worker.
At least 1 worker must be set.
The count field indicates how many replicas of that job you want to have deployed.
Environment variables injected by the operator
The following environment variables are injected to setup the distribution between the different containers.
MASTER_PORT:       9999
MASTER_ADDR:       xgboost-dist-demo-master-0
WORLD_SIZE:        3 # number of container
RANK:              1 # rank of current container (from 0 to $WORLD_SIZE - 1)
Sample projects
AIchor team has shared this demo project that can be cloned and used for AIchor experiments using XGBoost operator.
Documentation
The operator that manages XGBoost experiments is JobSet
PyTorch
PyTorch is a popular open-source deep learning framework primarily developed by Facebook's AI Research lab (FAIR). It provides a flexible and dynamic approach to building neural networks and conducting deep learning research.
How to use PyTorch Operator on AIchor
AIchor users can use PyTorch operator by specifying it in the “operator” field on the manifest.
spec:
  operator: pytorch
  image: image
  command: "python3 src/main.py"

  activeDeadlineSeconds: 86400 # optional, will be overwritten by "timeout" if you provide both
  timeout: "1w 2d 5h 6m 20s" # optional, in weeks (w), days (d), hours (h), minutes (m) and seconds (s)

  types:
    worker: # worker MUST be written in a lower case w
      count: 2
      resources:
        cpus: 4
        ramRatio: 3
        shmSizeGB: 0
        accelerators:
        gpu:
          count: 1
          type: gpu
          product: Quadro-RTX-4000
Available types
PyTorch Operator comes with only one type: worker.
At least 1 worker must be set.
The count field indicates how many replicas of that job you want to have deployed.
Environment variables injected by the operator
Environment variables are injected to setup the distribution between the different containers.
MASTER_PORT:       23456
MASTER_ADDR:       pytorch-dist-cifar-master-0
WORLD_SIZE:        3 # number of container
RANK:              1 # rank of container (from 0 to $WORLD_SIZE - 1)
Sample projects
AIchor team has shared this demo project that can be cloned and used for AIchor experiments using PyTorch operator.
PyTorch demo training using Hugging Face Accelerate
Documentation
The operator that manages Pytorch experiments is JobSet
pytorch docs pytorch docs about communication
Jax operator
JAX is an open-source library developed by Google Research that provides a way to perform numerical computing and machine learning tasks with high performance and automatic differentiation.
How to use Jax on AIchor
AIchor users can use Jax operator by specifying it in the “operator” field on the manifest.
spec:
  operator: jax
  image: image
  command: "python3 -u main.py --operator=jax --sleep=300 --tb-write=True"

  tensorboard:
    enabled: true

  activeDeadlineSeconds: 86400 # optional, will be overwritten by "timeout" if you provide both
  timeout: "1w 2d 5h 6m 20s" # optional, in weeks (w), days (d), hours (h), minutes (m) and seconds (s)

  types:
    worker: # worker MUST be written in a lower case w
      count: 2
      resources:
        cpus: 1
        ramRatio: 2
        shmSizeGB: 0
        accelerators: # optional
          gpu:
            count: 1
            type: gpu
            product: NVIDIA-A100-SXM4-80GB
...
Available types
Jax Operator comes with only one type: worker. Lower case "w" must be respected
At least 1 worker must be set.
Environment variables injected by the operator
The following environment variables are injected to setup the distribution between the different containers.
JAXOPERATOR_COORDINATOR_HOST
JAXOPERATOR_COORDINATOR_ADDRESS
JAXOPERATOR_NUM_PROCESSES
JAXOPERATOR_PROCESS_ID
JAXOPERATOR_COORDINATOR_ADDRESS: The address of the first pod in the job which will act as the coordinator. Please have in mind that this address will, by default, include both the address of the coordinator pod and the port on which it will be listening on. However, in cases that the used image for the containers is not capable of implementing bash commands, you must manually append a port (example ":1234") to the end of the JAXOPERATOR_COORDINATOR_HOST env var to act as the listening port on your coordinator pod
JAXOPERATOR_COORDINATOR_HOST: The address of the coordinator without the port added to it, this will be the fallback env var in case the image does not support bash commands.
JAXOPERATOR_NUM_PROCESSES: Total number of jax pods running in parallel
JAXOPERATOR_PROCESS_ID: The rank of the current pod among all the pods in the job
Sample projects
AIchor team has shared this demo project that can be cloned and used for AIchor experiments using Jax operator.
Documentation
JobSet operator
JobSets are not controlled by custom ML Kubernetes Operators, it is a Kubernetes-native CRD maintained by SIG Apps that lets you manage a group of Jobs as one distributed workload. It also allows for a 2D array of jobs to be created in each experiment, this will be explained further below
How to use JobSet on AIchor
AIchor users can use JobSet operator by specifying it in the “operator” field on the manifest.
spec:
  operator: jobset
  image: image
  command: "python3 -u main.py --operator=jobset --sleep=300 --tb-write=True"

  tensorboard:
    enabled: true

  activeDeadlineSeconds: 86400 # optional, will be overwritten by "timeout" if you provide both
  timeout: "1w 2d 5h 6m 20s" # optional, in weeks (w), days (d), hours (h), minutes (m) and seconds (s)

  types:
    master:
      count: 1
      completions: 1 # optional
      parallelisms: 1 # optional
      resources:
        cpus: 1
        ramRatio: 2
        shmSizeGB: 0
        accelerators: # optional
          gpu:
            count: 1
            type: gpu
            product: NVIDIA-A100-SXM4-80GB

    worker:
      count: 5
      completions: 4 # optional
      parallelisms: 2 # optional
      resources:
        cpus: 4
        ramRatio: 3

    worker-2:
      count: 1
      completions: 4 # optional
      parallelisms: 1 # optional
      resources:
        cpus: 2
        ramRatio: 3
...
Available types
Under types any name can be set for the jobs (as long as it does NOT include uppercase letters, or start with digits and hyphens) . At least 1 job must be set. The completions in each type will indicate how many pods you want of each type. For the example provided above, the worker-2 type will have 4 pods deployed by it, each requesting 2 CPU and no GPU.
The count field in each type will indicate how many replicas of that job you want to have deployed. For the example above you can see that for worker type we want 5 replicas of the job, this is not to be mistaken with pod number. The number of pods in each job is still indicated by completions. in the case of worker types we will end up with 5 replicas of worker jobs, each requesting 4 pods. So with this example we will have 20 pods in total deployed by worker type jobs
The parallelisms field indicates that how many pods are supposed to run at a time in each job replica, when looking at worker-2 we can see the parallelisms is set to one so in this example we will have one replica of worker-2 and will deploy one pod at a time, once the pod finishes it's processes then it will end and then the next pod will start. This will continue until all the 4 total pods have finished their task.
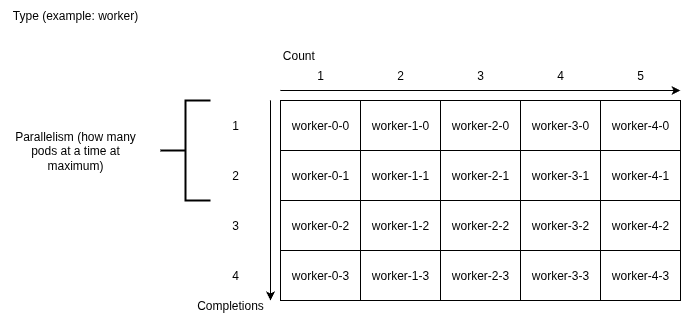
Another way of looking at this could be to look at JobSet jobs as a 2D array like below
xxxxx-name-a-b-xxxxxx
Where name is the name you've chosen for the type (here we have worker, worker-2 and master). "a" is the replica index of the job (starting from 0 and going up to one less than the number you have set for the count of that job) "b" is the number of the pod from that replica (it starts from 0 and goes up to one less than the number you've set for completions)
Environment variable injected by the operator
The following environment variable is injected to setup the distribution between the different containers.
JOB_COMPLETION_INDEX
We have also added these environment variables to each pod:
JOB_INDEX
GLOBAL_REPLICAS
JOB_GLOBAL_INDEX
REPLICATED_JOB_NAME
REPLICATED_JOB_REPLICAS
JOB_COMPLETION_INDEX: The pod position in each job replica, in the table drawn above you can consider it as the same as the completions axis minus one, so for example pod worker-0-2 and worker-3-2 will both have JOB_COMPLETION_INDEX=2 injected into them.
JOB_INDEX: the index of the replica of the job is this pod a part of, in the table drawn above you can consider it as the same as the count axis minus one, so for example pods worker-1-2 and worker-1-3 will both have JOB_INDEX=1.
GLOBAL_REPLICAS: total number of jobs in all the types.
JOB_GLOBAL_INDEX: the index of the job in relation to all the jobs in all the types, so it can range from 0 to GLOBAL_REPLICAS minus one.
REPLICATED_JOB_NAME: the name of the type this pod belongs to, so in our example it can be master, worker or worker-2.
REPLICATED_JOB_REPLICAS: the total number of jobs for the type this pod is a part of, so for our example it will be 1 for the pods that are from the master type, it will be 5 for the pods that are from the worker type and it will also be 1 for the pods that are from the worker-2 type.
Documentation
AIchor team has shared this demo project that can be cloned and used for AIchor experiments using JobSet operator.